White Chocolate Apricot Oatmeal Cookies
May 29, 2011
These cookies come to you sans story. In elementary school we learned that the key to a good story, or any story, is a hook in the first paragraph or sentence, and I realize beginning a blog entry with a complaint about not having a story is not necessarily the way to make people want to read what you have to say. Now that I’m thinking about it, it’s almost as if I baked these cookies because I didn’t have anything to say.
I’m re-reading that first paragraph and shaking my head in shame. Sorry, folks. I’ll try to explain.
 Baking is something that I fell into and love for many reasons. It engages my brain and my senses, almost like flipping a switch that makes me more conscious of the world around me and all the amazing things that can happen when you combine certain parts of the world – research and ingredients and recipes and baked goods being a kind of microcosm of the world in general. Conversely, baking allows me to disengage when I need to, in the sense that the process has become so natural to me that the mechanics are soothing, and the baked good at the end of the journey is of great comfort to my sometimes overly exhausted mind. I baked these cookies on a whim because I love the blog they came from, had the ingredients on hand, and had to take a serious mental vacation, if only for an hour or two.
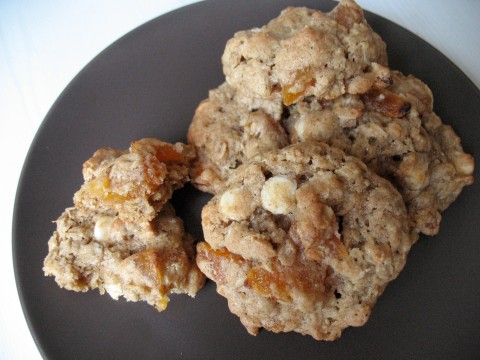
The bloggers who made these white chocolate apricot oatmeal cookies were not super impressed with them, but I definitely loved them. It might just be that I’m a total sucker for dried apricots, and oatmeal in any way, shape, or form. Verdict is still out on that one.
Before sending you out into the world with this recipe, I’ll pass along a tip I learned while reading about oatmeal cookies. Most of the recipes I’ve read concerning these treats say that chilling the dough for the appropriate amount of time is key to a chewier, thicker cookie. Some say that the cookie dough is best after an evening in the fridge, and some recommend scooping the cookies onto a baking sheet, freezing them, and baking them as needed (which you can do for just about any cookie). I definitely noticed a difference between the cookies that got more time in the fridge before baking and the ones who were able to stay cold a little longer. I say this because I’m usually that person who sees chilling time in a cookie recipe and makes the executive decision (of an impatient cookie monster) to skip it, and in this case it really paid off to be patient.
Also, happy Memorial Day!
White Chocolate Apricot Oatmeal Cookies
(Recipe adapted from The Bitten Word)
Yields about 4 dozen cookies
Ingredients:
1 ½ cups all-purpose flour (or 1 cup whole wheat flour and ½ cup all-purpose)
1 ½ cups old fashioned, or rolled, oats
½ teaspoon baking soda
1 cup, or 2 sticks, unsalted butter, softened
¼ cup granulated sugar
1 cup light brown sugar, packed
1 teaspoon salt
1 teaspoon vanilla extract
2 eggs
8 ounces white chocolate, chopped or chips
7 ounces, or 1 ½ cup, dried apricots, chopped (I chopped the apricots pretty irregularly and really liked the different-size pieces in the finished product.)
Method:
1. In a medium-size mixing bowl, stir or whisk together flour, oats, baking soda, and salt. Set aside.
2. In a large mixing bowl, or bowl of a stand mixer, cream together butter and sugars until light and fluffy.
3. Stir in eggs and vanilla extract (on low speed, if using a stand mixer) and beat until well combined.
4. Gradually add flour and oat mixture just until combined. Stir in chopped apricots and white chocolate.
5. Cover cookie dough and refrigerate for at least a half hour. While dough is in the fridge, preheat oven to 350 degrees F and line baking sheets with parchment paper.
6. Scoop cookies by the tablespoonful (or with a cookie scoop) onto baking sheets, spacing them about 2 inches apart because the cookies will spread a bit. Bake cookies for 14 to 16 minutes.
7. Let cookies cool on baking sheets for 2 to 5 minutes before removing to a cooling rack to cool completely.
Store in an airtight container at room temperature up to 3 days.
Filed in Cookies, Uncategorized, Variety Flour
Tags: apricot, cookies, Oatmeal, white chocolate, whole wheat flour
1-2-3-4 Cookies
April 11, 2011
When I started making these cookies, I was pretty sure the name 1-2-3-4 cookie was derived from how many bowls you’re supposed to use during preparation. I used at least 4 mixing bowls. Turns out the name comes from the original list of ingredients from the 1884 edition of Boston Cooking School Cook Book: 1 cup butter, 2 cups granulated sugar, 3 cups flour, and 4 eggs. The recipe is made more manageable by quartering it, though I’m sure you could bury yourself in 1-2-3-4 cookies by attempting the original proportions if you chose to do so. I also like the name of these cookies because it’s almost like they named them after how easy they are to make. One, two, three, four, COOKIES! Might just be me.
Title considerations aside, I had a hankering for non-chocolate cookies. My ideal non-chocolate cookie, aside from shortbread, is the snickerdoodle. This recipe called to me because it’s not exactly a snickerdoodle but has enough in common to make me smile and remember the good old days of stealing cookies from my friends in elementary school. To be fair, their mothers made THE best snickerdoodles. And eventually I got permission to take their cookies. Promise.
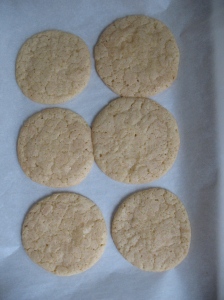
There is a note in the recipe, but I’ll mention that it’s important not to over bake these particular cookies; otherwise they will be all crisp and no chew. The beautiful thing about 1-2-3-4 cookies is the delicate balance between crispy exterior and chewy interior, and throwing off said balance would be a sad day, indeed. Also, they spread like crazy in the oven so it’s wise to follow the recipe and place cookies three inches apart on the baking sheet. I’m always that person who tries to cram as many cookies as possible on to baking sheets, and doing so in this case meant I ended up with a large, break-apart cookie instead of six lovely, golden circles.
(Recipe adapted from Baking in America)
Yields 12 large cookies
Ingredients:
2/3 cup all-purpose flour
1/8 teaspoon baking soda
¼ teaspoon cream of tartar
1/8 teaspoon salt
¼ teaspoon ground cinnamon
4 tablespoons unsalted butter, room temperature
½ cup granulated sugar
1 egg, separated
Optional: 1-2 teaspoons cinnamon sugar for rolling
Method:
1. Preheat oven to 350 degrees F and line baking sheets with parchment paper.
2. In a medium bowl, sift or whisk together flour, baking soda, cream of tartar, salt, and cinnamon. Set aside.
3. In the bowl of a stand mixer or large bowl (if completing recipe by hand), beat butter and ¼ cup granulated sugar until light and fluffy, 3 to 4 minutes.
4. In a small bowl, beat egg yolk until thickened only slightly, then gradually add remaining ¼ cup granulated sugar. Beat yolk and sugar for 2 to 3 minutes.
5. Add yolk mixture to butter and beat until completely combined.
6. In a medium bowl, whip egg white until stiff peaks form. Fold into butter mixture and combine well.
7. Add flour mixture to batter and mix until stiff, sticky dough forms. If you were using a stand mixer, you might want to complete this step by hand to avoid over mixing.
8. Divide dough into 12 equal sized balls, about 1 tablespoon each. Roll tops in cinnamon sugar if desired.
9. Place balls of dough on baking sheets at least 3 inches apart (these cookies spread like crazy) and flatten them to ¼ inch thick rounds, using the bottom of a drinking glass or your palm.
10. Bake cookies for 11-12 minutes, being careful not to over bake. Cookies should be taken out before they start to brown.
11. Let cookies cool on baking sheet for 2 minutes before removing them to a cooling rack to cool completely.
Cookies are best eaten the day they are made. Store them in a container with loose lid (or airtight, though you may lose some of the crispiness) at room temperature for up to a day.
Filed in Cookies, Uncategorized
Tags: cinnamon sugar, cookies, snickerdoodles
Happy Valentine’s Day! Part Two: Black and White Cookies
February 14, 2011
There has been a lot of pink and red floating around this week, on the interweb and beyond. Don’t get me wrong! I love pink and red with an outrageous girly passion, but wanted to switch it up and treat my friends to something a little different this Valentine’s Day. I’ve been looking forward to making black and whites for the last two weeks, because they are one of my all-time favorite desserts, they act as a kind-of shout out to my partner-in-space living in New York City, AND they look so darn cool.
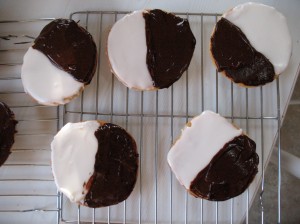
After perusing a whole lot of recipes and resisting the temptation to take a recipe straight out of Baked Explorations (my obsession with that book is getting ridiculous), I decided to mash some recipes and throw authenticity out the window. These black and whites are tuned to my preferences, a rich and sturdy but still airy, cakey cookie with a ton of glaze, using melted dark chocolate for the black and tons of sugar for the white.
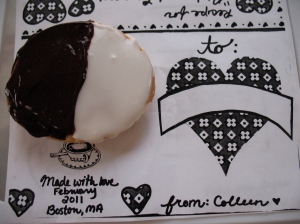
If you like taking pictures of your food, you’ll have a field day taking pictures of black and whites. I didn’t realize just how crazy I’d go with the camera and just how photogenic the black and white glazes are. Originally I planed to write initials with royal icing, or use a stencil to create powdered sugar hearts, but black and whites need no adornments.
Happy Valentine’s Day! Again!
Black and White Cookies
(Recipe forged from Joy the Baker and Baked Explorations)
Yields 15 cookies using a ¼ cup scoop
Ingredients
Cookie:
2 ½ cups all-purpose flour
1 teaspoon baking soda
½ teaspoon salt
2/3 cup buttermilk, or 2/3 cup milk with 1-2 teaspoons vinegar and left to sit for 5 minutes
1 tablespoon vanilla extract
11 tablespoons, roughly 2/3 cup, unsalted butter, cool but not cold
2 eggs
1 egg yolk
Vanilla glaze:
2 cups powdered sugar
1 teaspoon light corn syrup
½ teaspoon vanilla extract
1-2 tablespoons milk or heavy cream
Chocolate glaze:
4 ounces semi-sweet or dark chocolate
3 tablespoons unsalted butter
1 tablespoon light corn syrup
Method
For the cookies:
1. Preheat the oven to 350 degrees F and line two baking sheets with parchment paper.
2. In a medium bowl, sift together flour, baking soda, and salt. Set aside.
3. Cut butter into tablespoon-size pats and place in the bowl of a stand mixer. Add sugar and beat until fluffy, about 3 minutes.
4. Add eggs one at a time, beating and scraping the bottom of the bowl after each addition. Add egg yolk, and beat until combined.
5. Stir vanilla extract into buttermilk.
6. Set mixer to “stir” or low speed, and add sifted flour mixture alternating with buttermilk mixture, starting and ending with the addition of flour (3 additions of flour and 2 additions of buttermilk) and mixing just until smooth between each addtion. Scrap the bottom of the bowl and stir at a low speed for about a minute after all ingredients are combined.
7. Using a ¼ cup ice cream scoop, or ¼ cup measuring cup, scoop dough onto prepared baking sheets, making sure there are at least 2 inches between each cookie, because they spread big time. I only got 4 cookies to a sheet.
8. Bake sheets one at a time for 15 to 17 minutes, until the edges are starting to brown, rotating sheets halfway through baking time.
9. Let cookies cool on baking sheets for 5 minutes, before moving them to a rack to cool completely.
For vanilla glaze:
1. Combine powdered sugar, corn syrup, vanilla extract, and one tablespoon milk. Mix. Glaze will be thick, but if it is still lumpy, add another tablespoon milk. Use immediately.
For chocolate glaze:
1. Chop or break chocolate into 1-inch pieces.
2. Cut butter into pats.
3. Combine all ingredients and melt, either in a double boiler or microwave.
4. Let cool to room temperature, or cool in fridge for 15 minutes before using.
To assemble cookies:
1. Turn cookies over, so you are frosting the bottom side of the cookie.
2. I usually frost using white first, because that is the glaze that sets fastest. Ice one half of cookie with vanilla.
3. Ice other half of cookie with cooled chocolate glaze.
To store cookies, glazed or unglazed, keep in an airtight container at room temperature for 2 to 3 days.
Filed in Cookies, Uncategorized
Tags: black and white, cookies, glaze, Valentine's Dau
Vegan Peanut Butter Cookies
January 24, 2011
Always looking for an excuse to get together, my friends and I decided to have a little “conference game party” this past weekend to eat, I mean, watch football. Though I’m not a huge sports fan, I appreciate the ability of these events to bring people together. We decided on a finger food theme, and they consented to my bringing desserts! Yay!
One of the things I wanted to bring was some sort of miniature cookie, one that could be eaten in a bite, because of the ooh-ahh-cute value and the practicality of it at a finger food party. This post inspired me, and I was all ready to start cookie production until reading the yield. I’m still super excited to try out the recipe but I didn’t have the motivation to deal with all that dough. And the recipe would have been hard to halve because it called for just one egg. Hard pressed for time and a solution, I turned to the girl who always saves me in such circumstances, Isa Chandra Moskowitz. Minutes later, I had a recipe and an hour or so later, I had cookies!
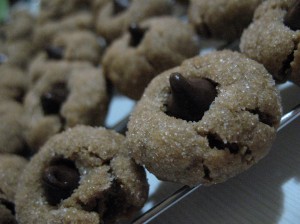
I ended up halving to half this particular recipe, yielding 4 dozen teaspoon sized cookies, in order to make them bite sized, and chocolate chip sized. Perfect! And my favorite part about these cookies is their versatility. You could make them and eat them on their own, or you could put candy in the centers after baking, like the ridiculously adored and well-known peanut butter blossom. I’m sure there are at least dozens of other ways to utilize this cookie base, as well, like making a thumbprint and filling them with jam after baking. Hence the reason I tweaked the name, wanting to highlight their adaptability.
“Multipurpose” Vegan Peanut Butter Cookies (originally called Peanut Butter Crisscrosses)
(Recipe adapted from Vegan Cookies Invade your Cookie Jar)
Yields 2 dozen cookies, rolling them into generous tablespoon size balls
Ingredients:
½ cup shortening
½ cup peanut butter, chunky or smooth (Isa recommends the natural, no-stir kind of peanut butter, which is what I used, but if you don’t have the no-stir variety, make sure to stir it very well to use it in the recipe)
¾ cup granulated sugar (or brown sugar)
1 teaspoon vanilla extract
2 tablespoons molasses or honey (if using brown sugar, eliminate this ingredient)
1 ¼ cups flour
2 tablespoons cornstarch
½ teaspoon baking powder
½ teaspoon salt
1 to 3 tablespoons (non-dairy) milk
Method:
1. Preheat the oven to 350 degrees F. If you have non-stick baking sheets, there’s no preparation necessary, otherwise grease your cookie sheets or line them with parchment. To get a crispy, brown bottom on these cookies, use dark metal baking sheets.
2. In a mixing bowl large enough to contain all ingredients, cream the shortening, peanut butter, and sugar until the mixture is light and fluffy, 4 to 5 minutes by hand.
3. Mix in vanilla and molasses/honey (if using).
4. Add half the flour, and the rest of the dry ingredients, and stir with a sturdy wooden spoon or using your hands to incorporate the ingredients.
5. Add the rest of the flour and keep combining the dough. If the dough will not stay together when squeezed, add the milk, one tablespoon at a time, mixing in between additions of milk until the dough comes together.
6. Pinch generous tablespoon sized pieces of dough and roll them into balls. From here you could roll them in sugar and bake as is (if you want to add some sort of mix-in on top after baking), or flatten them with the back of a glass and then use a fork to press the crisscross shape into the top of each cookie. These cookies do not spread much at all, so they only need to be an inch or so apart when placed on the baking sheets.
7. Bake each sheet in a preheated oven for 10 to 12 minutes, until the edges are slightly browned.
8. Let the cookies cool on the sheet for 6 to 10 minutes, then transfer them to a rack to cool completely.
Store in an airtight container at room temperature for up to a week, though after 3 days, like most baked goods, the cookies get a tad stale.
Filed in Cookies, Uncategorized, Vegan
Tags: chocolate chips, cookies, Isa Chandra Moskowitz, peanut butter, vegan
From America’s Test Kitchen… Chocolate Cookies
January 17, 2011
I apologize for the radio silence, and am offering up this recipe in hopes of forgiveness. My roommate just came up with the complete America’s Test Kitchen TV Show cookbook, and everything in my life melted away, except the urgent desire to make cookies. And eat chocolate. Though it’s safe to assume I always have the burning desire to eat chocolate. Even though it’s 9 o’clock in the morning.
In the blurb above this recipe, from the cookbook, the authors write that they are automatically skeptical when cookies tote themselves as intensely chocolate-y. They did what they do best, and created a recipe to allay suspicions and prove that intense chocolate cookies are possible in this sad world of impostors. Not only are they possible, but they are insanely easy to throw together.
Thank you, ATK, for compelling me to make cookies for breakfast. I wouldn’t have it any other way.
Chocolate cookies
(Recipe minimally adapted from The Complete America’s Test Kitchen TV Show Cookbook (2001-2010). “Minimally adapted” because at this point in the game I don’t mess with ATK.)
Yields 20 to 25 cookies using two tablespoons of dough, about 16 if those two tablespoons are very generous
Ingredients:
1/3 cup granulated sugar, plus extra for rolling
1 ½ cups all-purpose flour
¾ cup unsweetened cocoa powder
½ teaspoon baking soda
¼ teaspoon plus 1/8 teaspoon salt (or a generous pinch of salt, if you don’t feel like measuring)
½ cup corn syrup (preferably dark, but I used light)
1 large egg white
1 teaspoon vanilla extract
12 tablespoons unsalted butter, softened
1/3 cup packed brown sugar (add a tablespoon of molasses if you are using light brown)
4 oz (about ¾ cup) chopped dark, semisweet, or bittersweet chocolate
Method:
1. Whisk or sift together the flour, cocoa powder, baking soda, and salt. Set aside.
2. Whisk the corn syrup, egg white, and vanilla together in a separate, smaller bowl. Set aside.
3. If you are using a stand mixer, beat the butter and both sugars on medium high speed until the mixture is light and fluffy. ATK suggests two minutes of beating. If there’s no mixer, cream the butter and sugars until light and fluffy.
4. Decrease the speed on the mixer to medium low, and gradually add the corn syrup mixture, beating for a few seconds until fully incorporated, scraping down the bowl as needed. You can do this step by hand, as well.
5. On low mixer speed, add the flour mixture and chopped chocolate, mixing until just incorporated. I just took the bowl off the stand mixer and did this step by hand with a sturdy wooden spoon, making sure to scrape the bottom of the bowl.
6. Chill the dough for no more than 30 minutes, to make it easier to shape. Preheat the oven to 375 degrees F and prepare your baking sheets with parchment paper.
7. When the dough has chilled and the oven preheated, roll the dough into balls, using a generous two tablespoons worth of dough. Roll the tops in the granulated sugar before placing them on your baking sheets two inches apart. I fit 6 to 7 cookies on each sheet.
8. Bake each sheet in the preheated oven for 10 to 11 minutes. The cookies will not look completely done when you pull them out, but don’t be alarmed! If baking two sheets of cookies at a time, switch the sheets at five minutes to ensure even baking.
9. Let the cookies cool on the baking sheet for five minutes before moving them to a cooling rack to cool completely.
Store them in an airtight container for up to a week! Though I doubt they will last that long. My roommates and I had them for breakfast. Talk about will power in the morning.
Filed in Cookies, Uncategorized
Tags: America's Test Kitchen, Chocolate, cookies

