Breakfast Tuesday: Chocolate Peanut Butter Plantain Muffins
October 25, 2011
The word “amalgam” kept popping up in the article I was reading this morning, before I embarked on my Breakfast Tuesday endeavors. It’s a word I grew close to, and practically fell in love with, during my time in graduate school. I always thought “amalgam” and all its variants were apt words to use when talking about literature because it’s a word with a huge scope, a word that makes sure you know that there are many, many things you can and should consider when looking at other words on a page. It reminded me that words aren’t just words; they are words with past definitions, words coming out of someone’s mouth, words used while thinking about other words, etc. Looking it up now, though, I see the definition is a lot more straightforward. Apparently, an “amalgam” is primarily an alloy used for filling teeth, and only secondarily a “mixture of different elements”. I guess being immersed in a world where poetry is practically shooting out of your eye sockets makes you see and understand things differently (and abstractly, it seems).
Regardless of the dictionary definition, it kept jumping off the page and grabbing my attention, basically screaming at me, and then hopping around to each corner of my mind. I remembered how much I loved the word because I loved thinking about the world as a seamless combination of all things past, present, and future. I browsed breakfast recipes, to share this Tuesday, in this state of mind and felt compelled to throw a bunch of ingredients together into one, self-contained, breakfast food. Muffins seemed perfect for the job because you really can just throw a bunch of pantry/fridge/fruit basket ingredients together to make your own baked and breakfast appropriate amalgamation. According to my poetically-stretched and partly made-up definition, at least!
(PS- Fun fact: The online dictionary lists “cocktail” as a synonym for both “amalgam” and “amalgamation”.)
Chocolate Peanut Butter Plantain Muffins
(Recipe adapted from Handle the Heat, originally “Chocolate Banana Muffins”)
Yields 12 muffins
Notes: Since the original recipe did not call for peanut butter, you could easily skip it, and, if you’re craving a sweeter breakfast, you can fold one cup chocolate chips or chopped chocolate into the batter before transferring it to the tin.
Ingredients:
3 very ripe plantains, mashed
¼ cup creamy peanut butter, melted and slightly cooled
¾ cup granulated sugar
1 large egg
1/3 cup unsweetened applesauce
½ cup whole-wheat flour
½ cup all purpose flour
½ cup unsweetened cocoa powder
½ teaspoon salt
1 teaspoon baking powder
1 teaspoon baking soda
Method:
1. Preheat oven to 375 degrees F and line muffin tin(s) with cupcake papers or grease individual muffin cups.
2. In a medium bowl, whisk together flours, cocoa powder, salt, baking powder, and baking soda until completely combined.
3. In a large bowl, whisk together plantains, peanut butter, sugar, egg, and applesauce until completely combined. Add flour mixture to wet mixture and fold ingredients together until just combined. Be careful not to over mix.
4. Fill each muffin cup almost to the top with an equal amount of muffin batter.
5. Bake muffins in preheated oven for 20 minutes, or until a cake tester inserted into a muffin comes out clean.
6. Cool muffins in pan for a few minutes before removing to a cooling rack to cool completely.
Muffins are best the day they are made, but can stay in an airtight container at room temperature up to two days. You could also freeze the muffins, baked or unbaked, up to a month, reheating or baking as needed.
Emerging from a cold: Chocolate Rice Pudding
October 14, 2011
It seems like I’m breaking free from a cold that has kept my head underwater for the last four days. I’m finally able to smell, and therefore taste, the food I make AND can look at words on a computer screen for more than ten minutes without feeling like I’m being abducted by aliens aboard a ship with bright lights and weird symbols. Not being sick also means I can enjoy dairy with the reckless abandon to which I’ve grown accustomed over the years. I wanted to celebrate all these things – not being sick, regaining the ability to enjoy food, being able to live my life free of haze – with dessert. Celebrations, in my mind, always call for dessert.
The weather is cooling down, so I wanted a celebration dessert that could not only be served warm but also provide the same feeling of full-body warmth, like soups and stews. It had to be chock full of dairy and chocolate, because I needed to up the indulgence ante. Maybe some whiskey, if I could swing it. Lo and behold, I came upon some recipes for rice pudding and my decision was made. Rice pudding fulfills all the requirements listed above, along with the added nostalgia of eating rice pudding my entire life. I grew up eating rice pudding with my family in PA, went on many late night grocery runs with boyfriends to get rice pudding and eat it out of the tub, and now I can add making rice pudding and sharing it with my friends as a adult wanna-be to the nostalgia check-list.
Rice pudding takes a little bit of time to make, but that’s it. The process is straightforward, the ingredients are usually on hand, and the final product is worth every minute of it. I plan to make rice pudding pretty often this coming winter! (My roommate has been warned.)
Chocolate Rice Pudding
(Recipe adapted from My Feasts)
Yields about 4 cups of pudding
Notes: The original recipe calls for ¼ cup arborio rice, but I did a little research and it looked like a lot of people used a cup rice per quart of milk. I took the leap and added an entire cup of rice. The pudding was delicious off the stove and delicious warmed up, but very, very rice-y. If you prefer a higher pudding to rice ratio, I’d recommend using 1/2 to ¾ cup rice (1/4 cup seems like very little if you’re craving rice pudding). Also, the addition of whiskey at the end is optional but AWESOME. If you’re not a whiskey drinker, try Irish crème or another fun liquor. You have a lot of leeway.
Ingredients:
3 tablespoons cocoa powder
½ cup granulated sugar
1 teaspoon salt
4 cups milk
1 cup arborio rice, uncooked
2 tablespoons whiskey
1 tablespoon vanilla extract
2 ounces dark chocolate, chopped
Method:
1. In a medium saucepan, combine cocoa powder, sugar, salt, milk, and rice. Whisk to fully incorporate all ingredients.
2. Bring mixture to a boil over medium high heat, and then reduce heat to low and let pudding simmer gently for 35 to 40 minutes, stirring frequently so the rice does not scorch, until rice is cooked and pudding is thickened.
3. Take pudding off heat and stir in whiskey (if using), vanilla, and chocolate. Stir until chocolate is melted.
4. Let pudding cool to desired temperature and serve!
Storage: This rice pudding kept well in the fridge for three days, and, although it cooled into a block, was great heated up. Keep pudding in an airtight container. If you decided to store pudding in a bowl and don’t enjoy puddin’ skin, place the plastic wrap cover directly over surface of pudding.
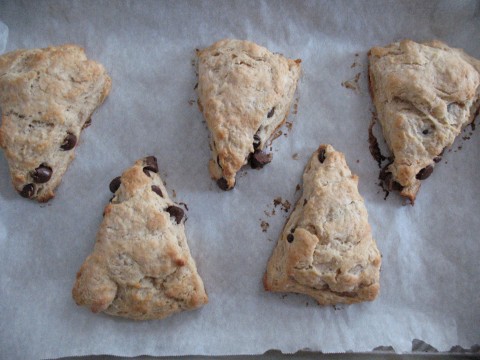
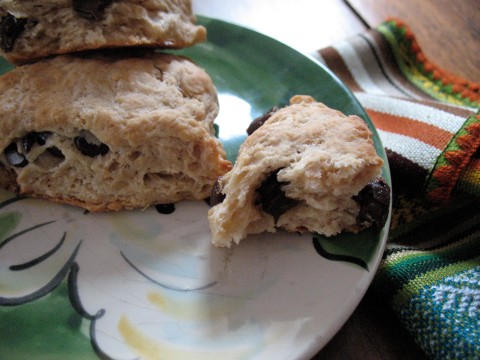
Breakfast Tuesday: Peanut Butter Chocolate Chip Scones
October 11, 2011
it’s 10 o’clock at night and I’m trying to write a post about the breakfast I made over twelves hours ago. I was thinking about putting it off until tomorrow, or even the next day, and could think of a bunch of excuses to justify it. I’ve been sick these last few days and feeling overwhelmingly tired stupidly early in the day. I got called into work on a day off, but had to go in because, hey, who doesn’t need the money? School applications are breathing down my neck and there are a million people with whom I have to get back in touch. I’m not even sure if people expect me to post a breakfast recipe on Tuesday, so what’s the point?
Now what? What is the point? That kind of thinking sucked me into a pretty dark spot, sitting here, writing this. I guess what’s keeping me going is the fact that I woke up super early, despite having to go into work and despite being sick, so I could make something fun to eat and share. I even made two batches of scones because the first recipe didn’t turn out as delicious as I thought it might. It was obviously important to me that I make the effort here and try my best to keep my word, even if my word means something as simple as making scones and posting pictures of them on the internets. Also, who doesn’t love peanut butter and chocolate in the morning?
Peanut Butter Chocolate Chip Scones
(Recipe adapted from bakingsheet)
Yields 16 smallish scones
Notes: There are two things that almost guarantee perfect scones: using very, very cold butter and working the dough quickly with your hands. I always cut my butter into the smallest cubes possible and stick them in the fridge for about 15 minutes before using.
Ingredients:
3 cups all purpose flour
1 tablespoon baking powder
½ teaspoon salt
2 tablespoons brown sugar
10 tablespoons butter, cut into ½ inch cubes and very cold
4 tablespoons peanut butter
1 cup and 2 tablespoons milk
1 teaspoon vanilla extract
½ cup chocolate chips
Method:
1. Preheat oven to 400 degrees F and line a baking sheet with parchment.
2. In a large mixing bowl, whisk together flour, baking powder, and salt.
3. Add peanut butter and cubes of butter to flour mixture and mix with your hands until mixture resembles coarse crumbs. Mix in chocolate chips.
4. Combine milk and vanilla extract, and then add to dough. Mix with your hands until just combined, then turn out onto a clean, floured surface and knead once or twice. This process should go very quickly and dough will be lumpy.
5. Split dough into 2-3 discs, about one to one-and-a-half inch thick, and cut into wedges.
6. Place wedges two inches apart on the baking sheet and bake each sheet 16-20 minutes, until edges are light golden brown.
7. Cool wedges on a baking sheet until cool enough to eat.
Storage: Scones do not store well, so I only bake enough scones to eat. To freeze ready-to-bake scones, just place unbaked wedges on a baking sheet and freeze until solid. Store frozen wedges in an airtight container or freezer bag until ready to bake and serve. You may have to add an extra two or three minutes to the baking time, but other than that everything is the same!
Whiskey Hot Fudge (a break from baby carrots)
September 19, 2011
I consider myself a healthy eater. Don’t laugh. I eat carrots with my lunch almost every day, cook at least three times a week, and keep active by pretending to run* around whatever body of water is closest to my apartment. My all-time, top favorite food might actually be tomatoes. Sometimes K, my roommate, and I eat quinoa and spinach and other super-health-hero-type foods. And then there’s this baking blog. How does one consider oneself a healthy eater when she has to buy butter every single time she goes to the grocery store, or eats some sort of cake/ice cream/pie/cookie every single day, or runs out of heavy cream on a weekly basis? I try, desperately at times, to balance out my baked good obsession with healthy things.
*My idea of running usually means jogging peacefully while making many stops to talk to chipmunks that, more often than not, turn out to be rocks, to coo at ducklings, or, as of late, to ponder how quickly the leaves change in Boston as compared to where I grew up in Pennsylvania.
Well, I’ve been baking a little less lately due to stress and extreme lack of time-management skills, but still have been eating like a normal, healthy adult. A little too well, if you ask me. People, sometimes I just need to go crazy, forget about superfood, and make something ridiculous. I present you with booze-infused hot fudge. Two of the most viciously delicious hedonistic pleasures, whiskey and chocolate, are combined in liquid form, and are just begging you to be eaten warm with ice cream or straight from the fridge, rolled in graham cracker crumbs. I think I hear it calling me now…
Whiskey Hot Fudge Sauce
(Recipe adapted from kitchenplay)
Yields 2 cups hot fudge
Notes: Original recipe calls for bittersweet chocolate, which I switched for dark, and a bit of instant coffee, which I omitted altogether. I also upped the whiskey from 3 tablespoons to ¼ cup. Shhh.
Ingredients:
7 ½ to 8 ounces dark (60% cacao) chocolate, broken up into 2 inch chunks
¼ cup granulated sugar
½ cup light corn syrup
½ cup plus 2 tablespoons water
¾ cup unsweetened cocoa powder
¼ cup whiskey
Method:
1. Melt chocolate in the top of a double boiler, or in a boil over gently simmering water. If using a microwave to melt chocolate, put chocolate in a microwave safe bowl and microwave for 45 seconds, take it out and stir, then place back in microwave for 30 seconds, and stir again. Repeat this process until chocolate is melted. Once chocolate is melted, set aside.
2. In a medium saucepan, bring granulated sugar, corn syrup, water, and cocoa powder to a boil over medium-high heat. Reduce heat to medium-low and simmer 1 to 2 minutes, stirring or whisking constantly to both dissolve cocoa powder and keep mixture from burning.
3. Keeping mixture over medium-low heat, whisk in melted chocolate until smooth. You can take it off the heat now if you prefer and more liquid-y hot fudge. If not, boil hot fudge for a few minutes until it reaches desired consistency.
4. Once off the heat, whisk in whiskey until smooth.
Keep fudge, stored in an airtight container, in fridge up to a week. To reheat, melt over low heat on stovetop or microwave for 10 to 15 seconds.


