I love to eat candy in the morning. More specifically, I love to eat chocolate. It’s not everyone’s cup of tea, to be sure, but my day is significantly better if I’m able to have breakfast that in some way, shape, or form contains chocolate. Today, on Breakfast Tuesday, this means a chocolate scone with chocolate glaze. Overkill? Maybe. But I’m not one to judge.

The only note about these scones is the same warning you get before making any scone: be sure not to over mix the batter before forming scones. Dough should be mixed just until moist, or in this case, just until it holds together enough to form a disc. The scones are pretty good by themselves, almost like breakfast brownies, but I’d highly suggest making the glaze as well. It’s pretty simple and adds a nice, dessert-like touch, for those of us who can’t resist dessert for breakfast.

Cinnamon Chocolate Scones with Chocolate Glaze

(Adapted from Small Batch Baking for Chocolate Lovers)

Yields 3 scones

Ingredients

For scones:

½ cup all-purpose flour

2 tablespoons granulated sugar

2 tablespoons unsweetened cocoa powder

½ teaspoon ground cinnamon

1/8 teaspoon baking soda

Small pinch of salt

2 tablespoons unsalted butter, cold and cut into ½ inch cubes

1 tablespoon well-beaten egg

2 tablespoons heavy cream

½ teaspoon vanilla extract

For chocolate glaze:

3 tablespoons chocolate chips or chopped bittersweet or semisweet chocolate

2 teaspoons unsalted butter

2 teaspoons hot water

1 tablespoon powdered sugar

Method:

For scones:

1. Preheat oven to 375 degrees F and line a baking sheet with parchment paper.

2. In a medium-size bowl, whisk or stir together flour, sugar, cocoa powder, cinnamon, baking soda, and salt.

3. Add butter and, using a pastry cutter or two knives, cut butter into flour mixture until a coarse crumb forms. Make a well in the center of mixture.

4. In a small bowl, beat together egg, cream, and vanilla. Pour into well of flour mixture and stir with a fork just until dough holds together. (My dough was still a bit crumbly, but I went ahead with the recipe, taking extra care when forming scones in the next step.)

5. Divide dough into three equal amounts and form into three discs about 1 inch thick. Place on prepared baking sheets.

6. Bake in preheated oven for 18 minutes, until scones are dry to the touch and a tester comes out clean.

7. Cool scones on baking sheet for 5 minutes before removing to a cooling rack. Scones do not need to be cooled completely before being topped with glaze.

For chocolate glaze:

1. Combine chocolate and butter and melt together, either in a microwave for 30 to 45 seconds or in a small saucepan over very low heat for 2 to 3 minutes, taking mixture off the heat when ingredients are melted completely. Stir mixture until smooth before adding next ingredients.

2. Stir in hot water until blended completely.

3. Stir in powdered sugar until blended.

4. Spoon over scones.

Scones are best the day they are made, so I would suggest serving these as soon as possible. They will keep lightly covered at room temperature for one day.

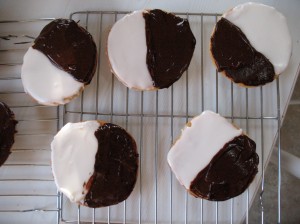
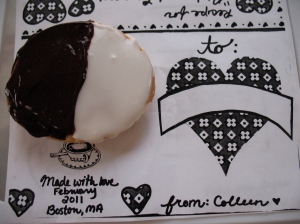
There has been a lot of pink and red floating around this week, on the interweb and beyond. Don’t get me wrong! I love pink and red with an outrageous girly passion, but wanted to switch it up and treat my friends to something a little different this Valentine’s Day. I’ve been looking forward to making black and whites for the last two weeks, because they are one of my all-time favorite desserts, they act as a kind-of shout out to my partner-in-space living in New York City, AND they look so darn cool.

After perusing a whole lot of recipes and resisting the temptation to take a recipe straight out of Baked Explorations (my obsession with that book is getting ridiculous), I decided to mash some recipes and throw authenticity out the window. These black and whites are tuned to my preferences, a rich and sturdy but still airy, cakey cookie with a ton of glaze, using melted dark chocolate for the black and tons of sugar for the white.

If you like taking pictures of your food, you’ll have a field day taking pictures of black and whites. I didn’t realize just how crazy I’d go with the camera and just how photogenic the black and white glazes are. Originally I planed to write initials with royal icing, or use a stencil to create powdered sugar hearts, but black and whites need no adornments.

Happy Valentine’s Day! Again!

Black and White Cookies

(Recipe forged from Joy the Baker and Baked Explorations)

Yields 15 cookies using a ¼ cup scoop

Ingredients

Cookie:

2 ½ cups all-purpose flour

1 teaspoon baking soda

½ teaspoon salt

2/3 cup buttermilk, or 2/3 cup milk with 1-2 teaspoons vinegar and left to sit for 5 minutes

1 tablespoon vanilla extract

11 tablespoons, roughly 2/3 cup, unsalted butter, cool but not cold

2 eggs

1 egg yolk

Vanilla glaze:

2 cups powdered sugar

1 teaspoon light corn syrup

½ teaspoon vanilla extract

1-2 tablespoons milk or heavy cream

Chocolate glaze:

4 ounces semi-sweet or dark chocolate

3 tablespoons unsalted butter

1 tablespoon light corn syrup

Method

For the cookies:

1. Preheat the oven to 350 degrees F and line two baking sheets with parchment paper.

2. In a medium bowl, sift together flour, baking soda, and salt. Set aside.

3. Cut butter into tablespoon-size pats and place in the bowl of a stand mixer. Add sugar and beat until fluffy, about 3 minutes.

4. Add eggs one at a time, beating and scraping the bottom of the bowl after each addition. Add egg yolk, and beat until combined.

5. Stir vanilla extract into buttermilk.

6. Set mixer to “stir” or low speed, and add sifted flour mixture alternating with buttermilk mixture, starting and ending with the addition of flour (3 additions of flour and 2 additions of buttermilk) and mixing just until smooth between each addtion. Scrap the bottom of the bowl and stir at a low speed for about a minute after all ingredients are combined.

7. Using a ¼ cup ice cream scoop, or ¼ cup measuring cup, scoop dough onto prepared baking sheets, making sure there are at least 2 inches between each cookie, because they spread big time. I only got 4 cookies to a sheet.

8. Bake sheets one at a time for 15 to 17 minutes, until the edges are starting to brown, rotating sheets halfway through baking time.

9. Let cookies cool on baking sheets for 5 minutes, before moving them to a rack to cool completely.

For vanilla glaze:

1. Combine powdered sugar, corn syrup, vanilla extract, and one tablespoon milk. Mix. Glaze will be thick, but if it is still lumpy, add another tablespoon milk. Use immediately.

For chocolate glaze:

1. Chop or break chocolate into 1-inch pieces.

2. Cut butter into pats.

3. Combine all ingredients and melt, either in a double boiler or microwave.

4. Let cool to room temperature, or cool in fridge for 15 minutes before using.

To assemble cookies:

1. Turn cookies over, so you are frosting the bottom side of the cookie.

2. I usually frost using white first, because that is the glaze that sets fastest. Ice one half of cookie with vanilla.

3. Ice other half of cookie with cooled chocolate glaze.

To store cookies, glazed or unglazed, keep in an airtight container at room temperature for 2 to 3 days.