Chocolate Orange Cake (Vegan)
January 10, 2011
On our first “date” as friends, this darling girl and I went to Sweet for cupcakes, and it has become a tradition. They switch up their menu with the change of seasons, and have special Valentine’s Day cupcakes (Which is coming up! Rejoice!), which we love because you never tire of the flavors. Conversely, though, you tend to miss the flavors you really enjoy when they are out of season, so to speak. One of those flavors is the chocolate orange cupcake, which I want to reproduce for her so she has a foolproof, easy to make recipe to use year round.
The only thing that I am deliberately changing about the chocolate orange cupcake is the cake itself. The Sweet version is a chocolate cake with orange buttercream frosting, but I would like to up the ante and find a recipe for chocolate orange cake. The first reason is personal, because I love zest in cake, but the second and REAL reason is that, just in case she doesn’t feel like making the frosting, she can simply make the cake and eat it plain. Although I’ll take this opportunity to say that I want to eat this frosting until the sun devours the Earth. Just sayin’.
All in all, I wasn’t particularly pleased with the way the cake turned out. The cupcakes were very, very crumbly, yet not overcooked. I’ve made vegan chocolate cake a few times before this, and was able to manage a moist cupcake, so naturally I was a little disappointed. The flavor was fantastic, even if it was super rich. The next time I make a vegan chocolate orange cake, I’m going to turn to Vegan cupcakes take over the world.
Random excitement, before turning over the recipe over to you, though! These cupcakes gave me a chance to use my cupcake corer!! It’s kind of a dream come true. As hard as it is to admit (because this is a baking blog, after all), I’m a frosting girl. So cupcakes filled with frosting, then topped with frosting? Yes. A thousand times, yes. I suppose you could fill them with anything you wish, but, again, this frosting is amazing.
Chocolate Orange Cupcakes (vegan)
(Adapted from momofukufor2)
Yields 12 full-size cupcakes
Ingredients:
1 ½ cups all-purpose flour
½ cup cocoa powder
1 cup granulated sugar
1 teaspoon baking powder
½ teaspoon baking soda
¼ teaspoon salt
¾ cup orange juice
½ cup vegetable oil
1 teaspoon vanilla extract
1 tablespoon orange zest
Method:
1. Preheat the oven to 350 degrees F. Line your muffin tins with cupcake papers.
2. In a large bowl, sift together the dry ingredients.
3. In a separate, smaller bowl, whisk together all other ingredients.
4. Make a well in the dry ingredients, then pour the liquid into the dry.
5. Mix the batter until everything is just combined.
6. Fill the cupcake liners with about ¼ cup batter, or at least make sure they all have even amounts of batter.
7. Bake tins in a preheated oven for 20 to 25 minutes, testing them at 20. When a butter knife or toothpick inserted into the cupcake comes out dry, you’re done!
8. Cool the cupcakes in the tin for at least 5 minutes, then let them cool on a cooling rack until they are room temperature.
Orange Frosting (Note: NOT vegan)
(Adapted from All Cakes Considered)
Yields more than enough frosting for 12 cupcakes, if you aren’t doing any crazy piping.
Ingredients:
½ cup, or one stick, unsalted butter, room temperature
3 ½ to 4 cups confectioners’ sugar
¼ cup evaporated milk
1 teaspoon vanilla extract
1 teaspoon orange extract
(Optional: 3 tablespoons of dried orange peel, or finely grated orange zest)
Method:
1. Using a mixer, cream the butter until it is smooth and fluffy.
2. Add 3 ½ cups confectioners’ sugar, and while mixing on low, add the evaporated milk.
3. When the sugar is incorporated, beat the frosting at a high speed for at least five minutes (I beat mine for 8 or 9 minutes, which was almost overkill). Add more confectioners’ sugar to get your desired texture.
4. Add the extracts and zest, if using, and beat on high for another minute or two until even distributed through the frosting.
To assemble cupcakes:

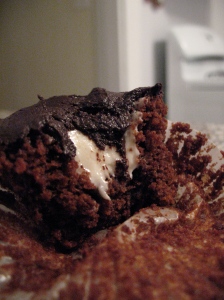
Exhibit A. This is what happens when you do not let the cupcakes cool to room temperature, when you don't let the ganache cool to a reasonable temperature, and when you don't even make the ganache properly because you're so intent on eating.
1. Wait until the cupcakes are room temperature!
2. Frost the cupcakes.
3. Keep them in an airtight container at room temperature for up to three days. If kept in the fridge, bring to room temperature or let sit for 10 minutes before eating because the frosting gets a little stiff when it’s cold.
Blondies from Dorie Greenspan, and a zine!
January 9, 2011
It’s that time again, when I put together recipes to make a baking zine. This zine will be dedicated to a close friend of mine, and therefore will contain four of her favorite treats. Er, well, four of her favorite treats that are accessible and relatively easy to prepare for any home baker. The best part about making and distributing a baking zine is hearing the recipients tell you about their adventures with the recipes, which is why I try to choose things that are, or can be, prepared with little to no fuss.
The first recipe is for her favoritest baked good, which also happens to be one of mine (coincidence?!), and is one of the easiest things to make with the biggest payoff: the blondie! I’ve been making her blondies with the same recipe for a good year and a half now, but strongly desire to branch out and try something new. Who better to turn to, in the world of baking, than Dorie Greenspan? I was lucky enough to receive Baking, from my Home to Yours, for the holidays, and have poured over it repeatedly since then. I trust her utterly and completely, which is why this branching-out blondie recipe is hers. Let me tell you, I was not disappointed. I think elated, ecstatic, and overjoyed are more appropriate adjectives for my feelings towards these blondies.
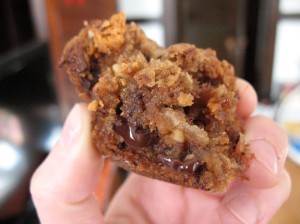
The batter is very thick, like cookies, which is different from my normal, kind of liquidy batter. The results were interesting, because the blondies still have a moist, decadent center, but formed a great crust around the edges. My other blondies were pretty uniform. I also love the amount of mix-ins Dorie uses, but you could probably cut back if you’d like. Next time I make these, though, I will add more chocolate. Yeah, I’m that person, the one who over-chocolates everything.
The only real difference between the recipe here and the recipe in the book is my addition of molasses. I love the way molasses makes blondies gooey in the center, and adds a really nice depth to the color.
Seems like I could write about blondies forever, but I’ll spare you. This time.

Imagine a little rover traversing the beautiful, lumpy landscape of these blondies. I like to, anyway. Seems like it would be a grand adventure!
Blondies
(Adapted from Baking from my Home to Yours, Dorie Greenspan)
Ingredients:
2 cups all-purpose flour
¾ teaspoon baking powder
½ teaspoon baking soda
½ teaspoon salt
2 sticks, or 1 cup, unsalted butter, at room temperature
1 ½ cups light brown sugar, packed
1 tablespoon molasses (or substitute dark brown sugar for the light brown sugar)
½ cup granulated sugar
2 eggs
1 teaspoon vanilla extract
6 oz chocolate for baking (Dorie suggests semi-sweet or bittersweet, and I went with 60% cacao), or one cup chocolate chips
1 cup butterscotch chips, or toffee bits
1 cup chopped walnuts
1 cup shredded coconut, preferably sweetened
Method:
1. Preheat the oven to 325 degrees F and butter a 9 by 13 inch baking pan. If you halve the recipe, you can use an 8 by 8 inch square baking pan. Put the prepared baking pan on a baking sheet.
2. Whisk or sift the dry ingredients together (flour, salt, and leavening agents). Set aside.
3. Cream the butter until it is smooth. If you are using a stand mixer, beat the butter on medium speed.
4. Add the sugars (and molasses), and beat the mixture for 3 minutes, or until the sugar is incorporated into the mix.
5. Add each egg individually, making sure to beat the batter for a minute after each addition.
6. Beat in the vanilla extract.
7. Either reducing the mixer speed to low or using a wooden spoon, add the dry ingredients, mixing only until visible traces of flour disappear. The batter will be reminiscent of cookie dough.
8. Stir in the mix-ins with a wooden spoon or spatula.
9. Scrape the batter into the prepared baking pan, and even out the top. The dough is sticky and unruly, so just do the best you can!
10. Bake in a preheated oven, on a baking sheet, for 40 minutes. Or you can take it out 5 minutes earlier if you’re an underbaked blondie fanatic like myself. The top should be browned, and a tester should come out clean.
11. Cool the blondies in a baking pan on a rack for 15 minutes, then remove the blondies from the pan, and cool them to room temperature. To do this, invert the pan onto a cooling rack, then invert the inverted pan onto another rack. Get it?! Sorry for the terrible directions… I’m still feeling out this recipe-writing thing.
Keep the blondies in an airtight container, at room temperature, for 5 days. Or freeze them, wrapped tightly in plastic wrap, for a up to a month.


